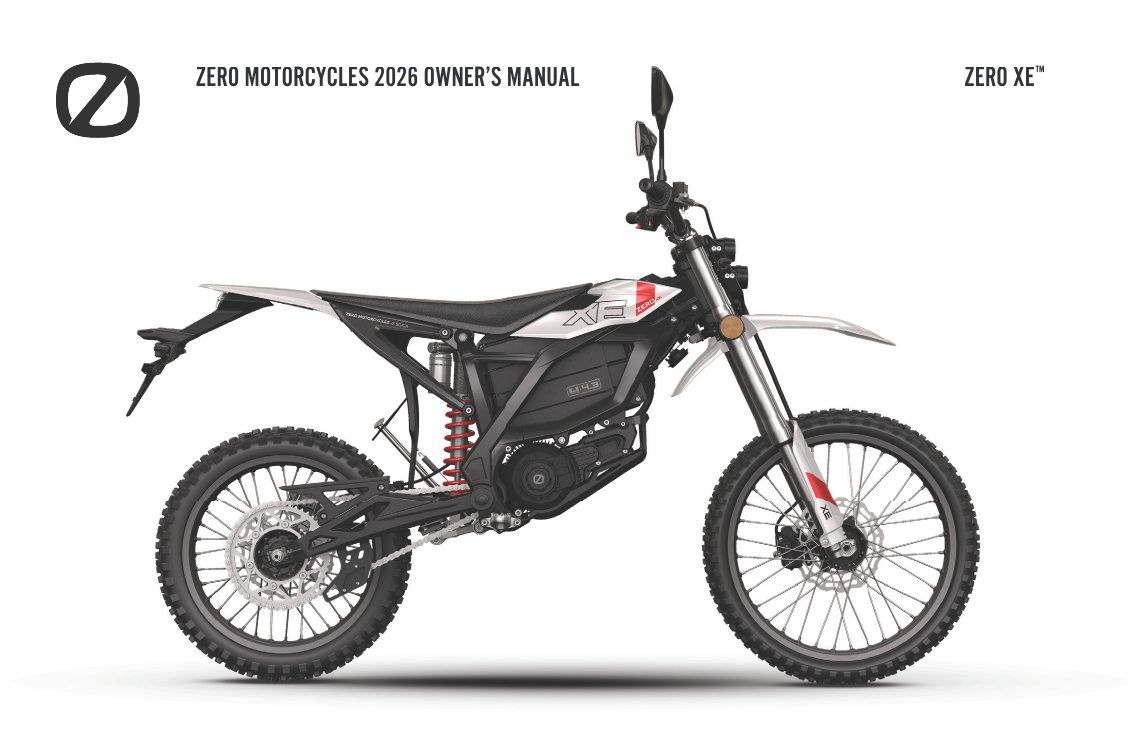
Zero XE: complete owner's guide
The Zero XE is Zero Motorcycles' lightweight, entry-level electric dual-sport: a 74-volt, 4.3 kWh machine with a mid-mounted motor, a removable battery, spoked 21"/18" wheels and, unusually for a Zero, a chain final drive with a gear-oil reduction unit. This guide condenses the official owner's and service manuals for XE owners: how the dash and controls work, the three ride modes and regenerative braking, charge times and battery care, the full maintenance schedule with torque and fluid specs, plus warning lights, fault codes and safe-riding rules.
Full specifications
Full Zero XE specifications from the official manual (2026 model year).
- Motor
- Mid-mounted
- Peak power
- 6 kW (8 hp)
- Peak torque
- 58 Nm
- Top speed
- 85 km/h
- Transmission
- Variable gear reduction
- Max capacity
- 4.3 kWh
- Nominal capacity
- 4.3 kWh
- Chemistry
- Lithium
- Onboard charger
- 0.8 kW
- Standard charge time
- Approximately 5.5 hours (800 W, off-board)
- Combined
- 100 km
- Curb weight
- 101 kg
- Seat height
- 900 mm
- Wheelbase
- 1355 mm
- Ground clearance
- 310 mm
- Front
- Telescopic forks with adjustable preload and rebound damping
- Rear
- Shock absorber with adjustable preload, compression, and rebound damping
- Front brake
- Hydraulic disc brake, DOT 4 fluid (caliper make/piston count and disc size not stated); friction plate wear limit 2.5 mm, disc wear limit 2.0 mm
- Rear brake
- Hydraulic disc brake, DOT 4 fluid (caliper make/piston count and disc size not stated); friction plate wear limit 2.5 mm, disc wear limit 2.0 mm
- Wheels
- spoked
- Front tyre
- 70/100-21M/C or 2.50-19 · 32 psi (225 kPa)
- Rear tyre
- 90/90-18M/C · 32 psi (225 kPa)
- Final drive
- Chain
- Headlight
- Separate high-beam and low-beam headlights, vertically adjustable (bulb tech/wattage not stated)
- Taillight
- Combined tail/brake light (illuminates with key on; brightens when brakes applied)
- Turn signals
- Front turn signals (bulb tech not stated)
Ride modes
How each selectable mode changes acceleration, top speed and regenerative braking.
| Mode | Character | Top speed | Regen | Best for |
|---|---|---|---|---|
| ECO | Softer power and acceleration | — | Adjustable levels 1-3 (set in menu) | New riders / gentle riding |
| STANDARD | Moderate power and acceleration (default mode) | — | Adjustable levels 1-3 (set in menu) | Everyday use once familiar with the bike |
| SPORT | Strong power | 53 mph (85 km/h) overall max | Adjustable levels 1-3 (set in menu) | Experienced riders; non-paved/forest roads |
Charging times
Charging scenarios and how long each takes to fill the pack.
| Method | Input | Time to full | Notes |
|---|---|---|---|
| Standard off-board charger | 110V or 220V AC, 800W off-board | Approximately 5.5 hours | 4.3 kWh pack (74V/58Ah); outlet load >=840W recommended; charges on or off the bike |
Dashboard warning lights
What each dashboard indicator means and what to do when it lights up.
TFT dash shows SOC battery gauge, speedometer, motor speed, clock, odometer/trip and active ride mode (shows Park when parked; Ready when kill switch enables travel). Fault codes are retrieved via MENU > FAULTS. When the temperature indicator lights, the malfunction indicator lights too — this is normal thermal protection (codes P111/P124), not a failure; top speed is reduced until the powertrain cools.
Looking for a specific error? Browse the full Zero error-code catalog →
Fault & diagnostic codes
Diagnostic codes the display and app can show, with what each means and the fix.
40 diagnostic codes for the Zero XE
| Code / fault | Meaning | What to do |
|---|---|---|
| b103 · Cell differential pressure fault 1 | Cell voltage imbalance detected | Contact Zero dealer |
| b110 · Discharge cell under-voltage fault 1 | A cell dropped below minimum voltage | Charge battery |
| b114 · BMS charging over-current fault 1 | Charge current too high | Reduce charging current |
| b119 · BMS discharge over-temperature fault 1 | Pack too hot during discharge | Limit power (level 1) |
| b120 · BMS charging over-temperature fault 1 | Pack too hot during charge | Limit charging current |
| b121 · BMS discharge under-temperature fault 1 | Pack too cold during discharge | Limit power (level 1) |
| b130 · BMS discharge over-current fault 1 | Discharge current too high | Reduce output current |
| b131 · Battery insulation fault 1 | Insulation resistance low | Contact Zero dealer |
| b140 · Charging unit battery under-voltage fault 1 | Pack voltage too low to charge | Charge battery |
| b302 · Cell failure | A battery cell has failed | Contact Zero dealer |
| b307 · BMS internal MOS or relay failure | BMS switching hardware fault | Contact Zero dealer |
| b309 · Total discharge over-voltage fault | Pack total voltage too high | Charge battery |
| b332 · Battery short circuit failure | Short circuit detected in pack | Contact Zero dealer |
| b333 · BMS internal communication failure | Internal BMS comms lost | Contact Zero dealer |
| b342 · Total charging over-voltage fault | Charge voltage too high | Check input voltage |
| b345 · Discharge cell over-voltage fault | A cell exceeded max voltage | Check battery |
| b348 · Communication failure | BMS communication fault | Contact Zero dealer |
| C101 · Charger fault 1 | General charger fault | Contact Zero dealer |
| C106 · Charger temperature fault 1 | Charger over temperature | Reduce charging current |
| C107 · Input over-voltage protection 1 | AC input voltage too high | Check input voltage |
| C108 · Input under-voltage protection 1 | AC input voltage too low | Check input voltage |
| C109 · Output over-current protection 1 | Charger output current too high | Cycle key off/on to reset |
| C110 · Output over-voltage protection 1 | Charger output voltage too high | Cycle key off/on to reset |
| C111 · Output under-voltage protection 1 | Charger output voltage too low | Cycle key off/on to reset |
| C304 · Short circuit protection 3 | Charger output short circuit | Contact Zero dealer |
| C305 · Open circuit protection 3 | Charger output open circuit | Contact Zero dealer |
| P111 · Controller over-temperature fault 1 | Motor controller too hot | Limit power (level 1); allow to cool |
| P112 · Electronic TCS malfunction | Traction control system fault | Contact Zero dealer |
| P123 · Motor controller system fault 1 | Controller system error | Check controller power cord for looseness |
| P124 · Motor over-temperature fault 1 | Motor too hot | Limit power (level 1); allow to cool |
| P126 · Battery imbalance warning 1 | Pack cell imbalance detected | Contact Zero dealer |
| P225 · Motor temperature sensor failure | Motor temp sensor fault | Contact Zero dealer |
| P301 · Controller over-voltage failure | Controller input voltage too high | Replace battery, then controller |
| P302 · Controller under-voltage failure | Controller input voltage too low | Charge battery |
| P303 · Controller over-current protection failure | Controller current too high | Cycle key off/on to reset |
| P304 · Motor locked failure | Motor stalled/locked rotor | Cycle key off/on to reset |
| P305 · Motor position sensor failure | Motor position/encoder sensor fault | Contact Zero dealer |
| P314 · Throttle (acceleration handle) failure | Throttle input fault | Check handle and wiring harness plug |
| P320 · Brake failure | Brake signal/switch fault | Contact Zero dealer |
| P322 · Precharge fault | Precharge circuit failure | Contact Zero dealer |
Maintenance schedule
Official service intervals and the belt / fluid replacement points.
| Interval | Service tasks |
|---|---|
| Every 300 mi (500 km) | Drive chain: check tension/adjust, inspect for wear, clean and lubricate |
| Every 1,250 mi (2000 km) | Check hardware torque, inspect sprockets, inspect wiring harnesses, check tip-over protection, check wheel/steering/suspension/swingarm bearings |
| Every 3,100 mi (5000 km) | Drive chain: replace |
| Every 4,300 mi (7000 km) or 4 months | Gear oil: replace |
| Every 6,200 mi (10000 km) or 12 months | Brake fluid: replace, front suspension: replace as necessary |
See this schedule on a distance axis →What a noise between services means →
Torque specifications
Key fastener torque values from the service manual.
| Fastener | Torque |
|---|---|
| Rear axle | 81 ± 7 lb·ft (110 ± 10 Nm) |
| Front axle | 20 ± 2 lb·ft (27.5 ± 2.5 Nm) |
| Rear sprocket screws | 22 ± 1.5 lb·ft (30 ± 2 Nm) |
| Front caliper bolts | 22 ± 1.5 lb·ft (30 ± 2 Nm) |
| Front brake rotor bolts | 7 ± 1.5 lb·ft (10 ± 2 Nm) |
| Rear brake rotor bolts | 7 ± 1.5 lb·ft (10 ± 2 Nm) |
| Swingarm to frame | 81 ± 7 lb·ft (110 ± 10 Nm) |
| Front motor mount | 44 ± 4 lb·ft (60 ± 5 Nm) |
Zero XE at a glance: specs, range and main figures
The Zero XE is a compact, single-rider electric dual-sport built to be approachable for new riders while still capable on unpaved trails. Its powertrain is a 74-volt high-voltage system pairing a mid-mounted motor rated at 6 kW continuous with a 4.3 kWh lithium battery, and it drives the rear wheel through a variable gear reduction and a conventional chain. Unlike Zero's belt-driven street bikes, the XE therefore needs regular chain cleaning, lubrication and gear-oil changes.
Performance is tuned for city and light off-road use rather than motorway speed: estimated top speed is about 53 mph (85 km/h), and range is roughly 65 miles (100 km) when cruised at a steady 31 mph (50 km/h). Peak motor torque is 43 lb-ft (58 Nm), multiplied by the gear reduction to as much as 468 lb-ft (634 Nm) at the rear wheel for strong low-speed pull. Real-world range varies widely with riding style, load, terrain, temperature and tyre pressure.
- Motor: mid-mounted, 6 kW continuous rated power; peak torque 43 lb-ft (58 Nm), up to 468 lb-ft (634 Nm) at the rear wheel
- Top speed: approximately 53 mph (85 km/h)
- Battery: lithium, 74 V / 58 Ah, 4.3 kWh usable energy (removable)
- Range: about 65 mi (100 km) at a steady 31 mph (50 km/h)
- Charging: 800 W off-board charger, ~5.5 hours to full, from 110 V or 220 V AC
- Drivetrain: variable gear reduction with chain final drive and a gear-oil reduction unit
- Wheels/tyres: spoked steel wheels, 1.85 x 21 in front / 2.15 x 18 in rear; 70/100-21 front and 90/90-18 rear tyres
- Brakes: 240 mm front rotor and 220 mm rear rotor, each with dual-piston calipers
- Weight: curb 223 lb (101 kg); max payload about 240 lb (109 kg), single rider only; gross vehicle weight 463 lb (210 kg)
- Dimensions: length 81.5 in (2070 mm), wheelbase 53 in (1355 mm), ground clearance 12 in (310 mm)
Controls, dashboard and indicator lights
The XE uses a two-position key switch (Off and On) mounted on the console ahead of the seat; On enables both accessories and travel, and you should always remove the key when parked to deter theft. The left handlebar switch cluster carries the high/low-beam light switch, the turn-signal switch (which you must cancel manually by centering it), the horn, a flash-to-pass button and the reverse button. The right cluster carries the kill switch (top disables the motor, bottom energises the powertrain for riding), the cruise-control button and the MODE button for cycling ride modes.
The display and rider aids are controlled by five dash buttons: MENU, TCS, Hazard, Park (P) and SET. The digital dash shows motor speed, road speed, battery state-of-charge, a clock, the active ride mode, odometer and resettable trip odometer, plus a bank of tell-tale indicators. A short press of MENU (while in Park) opens the settings menu; SET cycles and confirms items, and a long press of SET enters a sub-screen.
The dash menu lets you configure RIDE aids (Tip-Over Assist, Uphill Assist and Regen Level), THEME (light or dark), BRIGHTNESS (five levels), UNITS (miles or kilometres), LANGUAGE, FAULTS (view active codes), TIME (12h/24h), SYSTEM (firmware versions) and RESET (restore factory display defaults).
- Front brake = right lever; rear brake = left lever. Release the throttle whenever you brake
- Reverse: with the bike stopped, hold the reverse button and twist the throttle; releasing the button stops movement and 'Reverse' shows on the dash
- TCS button toggles traction control; the TC indicator (with a strike-through) shows when TCS is off, unavailable, or faulted
- Park (P) button: enables/disables Park mode. The bike cannot move while Park is active
- Main dash indicators: turn signals, kill switch, kickstand (lit when deployed), tip-over, malfunction (MIL), temperature, TCS, cruise control, high beam and charging
- The speedometer only displays when the kickstand is up and the kill switch is in the run position
- Reset the trip odometer: long-press SET until it blinks, then short-press SET to zero it
- 1With the bike in Park, short-press MENU to open the menu.
- 2Short-press SET to move through the menu items.
- 3Long-press SET to enter the highlighted sub-screen (e.g. THEME, UNITS, RIDE).
- 4Short-press SET to change the value, then short-press MENU to confirm and exit.
Ride modes, throttle and regenerative braking
The XE offers three ride modes, selected with the MODE button on the right switch cluster. The bike must be on with the throttle released to switch, but you can change modes while rolling as long as the throttle is closed. STANDARD is the default; ECO softens power delivery for new riders and maximum efficiency; SPORT unlocks the strongest response and is aimed at experienced riders on unpaved surfaces such as forest roads.
Regenerative braking is adjustable through the RIDE menu on three levels (1 = lowest, 3 = highest). Higher regen returns more energy to the battery and slows the bike more firmly the instant you close the throttle, giving a stronger one-pedal-style deceleration; lower regen lets the bike coast more freely. Cruise control holds a set speed without throttle input and cancels automatically when you brake, change modes, hit the kill switch, or press the cruise button again.
Two rider aids work alongside the modes: Uphill Assist prevents the bike from rolling backward (or forward) while stopped on an incline, and the Tip-Over Sensor / Tip-Over Assist cuts throttle to the motor if the bike falls over. Traction control (TCS) limits rear-wheel slip under acceleration and can be toggled off for loose surfaces.
- ECO: softest power and acceleration, best for new riders and range
- STANDARD: moderate, balanced power, the default everyday mode
- SPORT: strongest power for experienced riders on unpaved/forest roads
- Regen Level 1–3: higher levels slow the bike more when you release the throttle and recover more energy
- Cruise control cancels on braking, mode change, kill switch, or a second button press
- Turn TCS off (via the TCS button) for deliberate wheel-spin on loose or muddy terrain
Battery, range and charging: times, connectors, do's and don'ts
The XE carries a 74 V / 58 Ah lithium battery holding 4.3 kWh, and it can be charged either in the bike or removed (it lifts out from under the seat). The supplied 800 W off-board charger plugs into a standard 110 V or 220 V AC outlet and takes roughly 5.5 hours for a full charge. Zero recommends a circuit capable of at least 840 W. Always connect the charger to the battery's charging port first, then to the wall; when finished, unplug from the wall first, then from the battery, and turn the key off before disconnecting.
The battery is happiest between 50–86°F (10–30°C) and can operate from 5°F to 113°F (-15°C to 45°C). Its management system will refuse to charge below 32°F (0°C) or above an internal 113°F (45°C), and after a hard ride it may delay charging until the pack cools. Never try to force-heat or force-cool the pack. Let it reach temperature naturally with the ambient air. Charge in a dry, ventilated place away from anything flammable, and never charge in the rain.
Avoid deep discharges, which shorten battery life: recharge when the gauge gets low. The bike has under-voltage protection, so an occasional low-charge cut-out is normal and recovers after charging. A solid green light on the charger means the pack is full.
- Charge time: about 5.5 hours to full with the 800 W charger
- Operating temperature: 5°F to 113°F (-15°C to 45°C); best performance 50–86°F (10–30°C)
- Do not charge below 32°F (0°C); the BMS blocks charging until the pack warms naturally
- Use only the supplied Zero charger or a Zero-approved replacement. Wrong chargers can cause failure or fire
- Long-term storage: keep the pack at 40–60% and top it up once a month; once a year, fully charge to 100% then run it down below 10%
- If the battery smells odd, smokes, or gets unusually hot while charging or riding, stop immediately, disconnect power, and contact a Zero dealer. Use a Class D extinguisher on a battery fire
- 1Turn the key switch off before connecting anything.
- 2Plug the charger's output lead into the battery charging port on the bike (left side).
- 3Plug the charger's input lead into the AC outlet.
- 4Confirm the charging indicator shows the pack is charging.
- 5When the charger light turns solid green, unplug from the wall first, then unplug from the battery port.
Break-in period and your first rides
A new XE needs a gentle break-in and a couple of early service visits. The front suspension has a defined break-in period of 500 miles (800 km); during this time some squeaking from the forks is normal, and proper stanchion lubrication reduces it. Zero also specifies an initial 60-mile (100 km) check of the drive chain, and an initial gear-oil change at 1,800 miles (3,000 km). These early services are important and should not be skipped.
Before every ride, run a quick pre-ride inspection: confirm the headlight and signals work, the handlebars turn freely, tyre pressures are correct, the chain tension is right, the brakes feel firm, and the kickstand cut-off works (the bike shouldn't drive with the stand down). Because the electric powertrain is so quiet, you'll notice suspension and chain noises more than on a petrol bike, which is normal.
- Front suspension break-in: 500 mi (800 km). Light squeaking is normal; keep the fork tubes lubricated
- First services: chain check at initial 60 mi (100 km); first gear-oil change at 1,800 mi (3,000 km)
- Pre-ride checks: lights, steering, tyre pressure (32 psi front and rear), chain tension, brakes, kickstand cut-off
- The motor emits a normal high-pitched buzz under power. It is the magnetic field, not a fault
- During the break-in and warranty period, keep to the dealer maintenance schedule
- 1Turn the key switch to ON.
- 2Raise the kickstand and move the kill switch to the run (bottom) position. 'PARK' appears on the dash.
- 3Hold both brake levers or press the Park (P) button to release the bike from Park mode.
- 4Press MODE to choose your ride mode (start in ECO or STANDARD).
- 5When it's safe, gently twist the throttle to pull away. To stop, close the throttle, press the top of the kill switch, deploy the kickstand and turn the key off.
Maintenance schedule, drive chain and gear oil care
Because the XE uses a chain and a geared reduction unit, its maintenance is more hands-on than a belt-drive Zero. The chain needs cleaning and lubrication about every 300 miles (500 km), and always after wet or dirty rides. Correct tension keeps it from being thrown or breaking. Chain slack (free up-and-down movement) should be 10–15 mm; if you see rust, tight links, worn or hooked sprocket teeth, or hear abnormal noise, replace the chain and both sprockets together.
The gear-reduction unit takes 6.0 fl oz (180 ml) of GL-5 85W-90 gear oil, changed first at 1,800 miles (3,000 km) and thereafter every 4,300 miles (7,000 km) or 4 months, whichever comes first. Brake fluid is DOT 4 and is replaced every 6,200 miles (10,000 km) or 12 months. Lubricate the chain with ISO grade 32 or 46 engine oil. Follow the torque values below whenever you refit safety-critical hardware.
Where an interval lists both mileage and time, follow whichever comes first. If you lack the tools or experience, have the work done by a Zero dealer. Improper maintenance can void warranty cover and cause damage.
- Every ride: tyres/pressure, brake operation and fluid level, lights and signals, suspension, battery condition
- Initial 60 mi (100 km): check and adjust drive chain
- Every 300 mi (500 km): clean, lubricate, check and adjust the drive chain; inspect sprockets
- Initial 1,800 mi (3,000 km): first gear-oil change (180 ml GL-5 85W-90)
- Every 1,250 mi (2,000 km): check hardware torque, inspect sprockets, wiring harnesses, tip-over protection, and wheel/steering/suspension/swingarm bearings
- Every 3,100 mi (5,000 km): replace the drive chain
- Every 4,300 mi (7,000 km) or 4 months: replace gear oil
- Every 6,200 mi (10,000 km) or 12 months: replace DOT 4 brake fluid; inspect/replace front suspension as needed
- Common torques: front axle 27.5 Nm (20 lb-ft), rear axle 110 Nm (81 lb-ft), front caliper bolts 30 Nm, brake-rotor bolts 10 Nm, rear sprocket screws 30 Nm, swingarm-to-frame 110 Nm, spokes 3.25 Nm (29 lb-in)
- Standard torques: M5 5 Nm, M6 10 Nm, M8 30 Nm, M10 40 Nm
- 1Remove the key, then lift the rear wheel on a stand so it spins freely.
- 2Remove the axle cap and loosen the rear axle nut.
- 3Turn the left and right adjuster bolts equally, keeping both at the same mark on the swingarm, until chain slack is 10–15 mm.
- 4Torque the rear axle nut to 110 ± 10 Nm (81 ± 7 lb-ft).
- 5Test-ride, then recheck the tension and readjust if needed.
Tyres, brakes and adjustable suspension
The XE rolls on spoked steel wheels: a 21-inch front and 18-inch rear, wearing a 70/100-21 front tyre and a 90/90-18 rear. Set both tyres to 32 psi (225 kPa) when cold (meaning not ridden for at least 3 hours) and check before every ride, since under-inflation is a leading cause of tyre failure. If you fit knobby off-road tyres for trail use, Zero suggests running lower pressures. Inspect wheels for bent, loose or missing spokes (spoke torque is 3.25 Nm / 29 lb-in) and cracked rims, and replace tyres showing cuts, bulges, exposed cords or uneven wear.
Braking is by hydraulic discs: a 240 mm front rotor and 220 mm rear rotor, each with dual-piston calipers, using DOT 4 fluid. Keep the fluid above the lower third of each sight glass and never ride with it lower. Replace the brake pads when friction material drops below 2.5 mm, and the disc when it wears below 2.0 mm. A long, spongy lever or noticeable fluid loss means you should stop and see a dealer before riding.
Suspension is fully adjustable. The left fork sets spring preload and the right fork sets rebound damping; the rear shock offers preload (set to match rider weight for correct sag), plus compression (H = harder, S = softer) and rebound adjustment. Clean and lightly lubricate the fork and shock stanchions after each ride, and never aim pressurised water or air at the dust seals.
- Tyre pressure: 32 psi (225 kPa) front and rear, checked cold
- Tyres: 70/100-21 front, 90/90-18 rear on 1.85 x 21 in and 2.15 x 18 in spoked wheels
- Brakes: 240 mm front / 220 mm rear discs, dual-piston calipers, DOT 4 fluid
- Wear limits: replace pads under 2.5 mm friction material; replace discs under 2.0 mm
- Front forks: left = preload, right = rebound; rear shock = preload + compression (H/S) + rebound
- Right lever works the front brake, left lever works the rear. Use both together for shortest, most stable stops
Storage, transport and winter care
If the XE will sit for more than 30 days, prepare it properly to protect the battery. Clean the bike, set the battery to roughly 40–60% charge, and turn the key off. Store it somewhere dry, ventilated and shaded, out of direct sunlight and away from damp, heat, flammables and corrosive chemicals. Raise both tyres off the ground on stands (after inflating to spec) so they don't flat-spot.
The battery needs periodic attention even in storage: keep it at 40–60% and give it a monthly top-up to stay in that band, ideally at 68–77°F (20–25°C). Once a year, cycle it fully (charge to 100%, then discharge below 10%) before returning to the monthly routine. Batteries left flat for long periods can be permanently damaged, and damage from improper storage is not covered by warranty.
In cold weather, remember the pack won't charge below freezing (32°F / 0°C) and range drops in the cold; let the battery warm naturally rather than using any heater. When ready to ride again after storage, fully charge the pack to restore it to peak condition.
- Parking 30+ days: clean the bike, set battery to 40–60%, key off, store dry and shaded
- Lift both wheels off the ground on stands to prevent tyre flat spots
- Battery: hold at 40–60% with a monthly charge; annual full 100% charge then discharge below 10%
- Ideal storage temperature for the battery: 68–77°F (20–25°C)
- Cold weather: no charging below 32°F (0°C); expect reduced range and warm the pack naturally
- Do not high-pressure wash or submerge the battery/battery box at any time
Warning lights, fault codes and troubleshooting
The XE's dash carries a malfunction indicator (MIL) and a temperature indicator that work together. Under sustained high-power demand the powertrain can climb past 167°F (75°C), lighting both the temperature and malfunction indicators and often logging codes P111 (controller over-temperature) and P124 (motor over-temperature). This is normal thermal protection, not a failure: the system stages down power (starting around 239°F / 115°C motor or 221°F / 105°C controller, and further from 248°F / 120°C), temporarily reducing top speed until things cool.
Active fault codes can be read from the dash FAULTS screen. Codes are grouped by system: 'b' codes relate to the battery and BMS (cell voltage, temperature, current, insulation), 'C' codes to the charger (input/output voltage, over-current, temperature), and 'P' codes to the powertrain (controller, motor, throttle, TCS, braking). Many low-level codes clear on their own once you charge the battery, let temperatures normalise, or cycle the key; persistent or insulation/communication codes call for a Zero dealer.
If the bike has power but won't move, work through the common causes below before assuming a fault. The most frequent culprit is a safety interlock like the kickstand, brake switch, tip-over sensor or a throttle that hasn't returned to neutral.
- Temperature + malfunction lights together during hard use = normal over-heat protection (codes P111/P124); power and top speed recover when cooled
- 'b' codes = battery/BMS; often clear after charging or once temperature normalises (insulation/communication faults need a dealer)
- 'C' codes = charger; check input voltage and connections, or reset by powering the bike off and on
- 'P' codes = powertrain/controller/motor; e.g. P302 undervoltage (charge the battery), P314 throttle fault (check throttle/wiring), P304 motor locked (key-cycle to reset)
- No power with key on: check the battery connector is fully seated, battery charge and temperature, and the main fuse
- Powers on but motor won't drive: retract the kickstand, check brake switches, reset the tip-over sensor, ensure the throttle is at neutral, and let an overheated motor/controller cool
- 1Stand the bike fully upright.
- 2Turn the key to OFF and wait for the display to go blank.
- 3Turn the key back to ON to reset the tip-over sensor.
- 4If a powertrain fault persists on the dash, stop riding and have a Zero dealer diagnose it.
Safety, payload limits and legal information
The XE is designed to carry the rider only (it has no passenger provision), with a maximum payload of roughly 240 lb (109 kg) and a gross vehicle weight of 463 lb (210 kg). Always ride with a helmet and proper protective gear, keep both hands on the bars and feet on the pegs, and never ride impaired, fatigued, or without the appropriate licence for an L3-A1E class electric motorcycle. Because the bike is nearly silent, use the horn to alert pedestrians who may not hear you coming.
The powertrain is a 74-volt high-voltage system: never open, disassemble, or modify the battery, motor or controller, and never alter the controller firmware or settings. Such modifications are strictly prohibited, can be dangerous, and void your warranty. Only Zero-trained technicians may service high-voltage components. Keep the dash's internal coin cell away from children. Swallowed button batteries can cause severe internal injury.
In the EU, the XE carries a two-year limited warranty (from the in-service date) that also covers the battery and its management system; damage from misuse, unapproved modifications, or improper battery storage is excluded. The 17-digit VIN is stamped on the frame's head tube and must never be altered. It is the bike's legal identifier.
- Single rider only; maximum payload about 240 lb (109 kg); gross vehicle weight 463 lb (210 kg)
- Always wear a helmet and protective gear and ride only with a valid licence (EU class L3-A1E)
- 74 V high-voltage system: no owner servicing, disassembly or firmware/controller modification
- Any controller/firmware modification is prohibited and voids the warranty
- EU limited warranty: 2 years from in-service date, including the battery and BMS
- Do not high-pressure wash; keep a Class D extinguisher available for any battery fire
- VIN is on the head tube; keep the owner's manual with the bike if you sell it
Frequently asked
What is the range of the Zero XE?
The Zero XE is rated at about 65 miles (100 km) when ridden at a steady 31 mph (50 km/h). Real-world range depends heavily on riding style, terrain, load, temperature and tyre pressure, so expect less with hard acceleration, cold weather, or off-road use.
How long does it take to charge a Zero XE?
Using the supplied 800 W off-board charger, a full charge takes approximately 5.5 hours from a standard 110 V or 220 V AC outlet. Zero recommends a circuit rated for at least 840 W. Charging is blocked below 32°F (0°C) or when the pack is too hot, and may be delayed after a hard ride until the battery cools.
What is the top speed of the Zero XE?
The Zero XE has an estimated maximum speed of about 53 mph (85 km/h). Top speed is temporarily reduced if the motor or controller overheats, returning to normal once temperatures fall back within range.
What tyre pressure does the Zero XE need?
Both tyres should be set to 32 psi (225 kPa) when cold, meaning not ridden for at least 3 hours. The XE runs a 70/100-21 front tyre and a 90/90-18 rear on spoked steel wheels. If you fit knobby off-road tyres for trails, Zero suggests lowering the pressures.
What ride modes does the Zero XE have?
The XE has three ride modes selected with the MODE button: ECO (softest power, ideal for new riders and efficiency), STANDARD (the balanced default), and SPORT (strongest power, intended for experienced riders on unpaved roads). You can switch modes while rolling as long as the throttle is closed.
Does the Zero XE use a belt or a chain?
Unlike Zero's belt-driven street models, the XE uses a chain final drive together with a gear-reduction unit. That means regular chain cleaning and lubrication (about every 300 miles / 500 km), keeping chain slack at 10–15 mm, and periodic gear-oil changes.
What kind of oil and fluids does the Zero XE use?
The gear-reduction unit holds 6.0 fl oz (180 ml) of GL-5 85W-90 gear oil. The brakes use DOT 4 fluid, and the chain is lubricated with ISO grade 32 or 46 engine oil. There is no engine oil or coolant to change since the drive is electric.
How often does the Zero XE need servicing?
Check tyres, brakes and the battery every ride. Clean and adjust the chain every 300 mi (500 km); change gear oil first at 1,800 mi (3,000 km) then every 4,300 mi (7,000 km) or 4 months; check hardware torque and bearings every 1,250 mi (2,000 km); replace the chain every 3,100 mi (5,000 km); and replace brake fluid every 6,200 mi (10,000 km) or 12 months.
Can the Zero XE carry a passenger?
No. The XE is designed for the rider only, with a maximum payload of about 240 lb (109 kg) and no passenger provision. Overloading affects handling, braking and stability.
Why are the temperature and warning lights on when riding hard?
Under sustained high power the powertrain can exceed 167°F (75°C), which lights the temperature and malfunction indicators and may log codes P111 and P124. This is normal thermal protection: the system reduces power and top speed to cool down, then restores full performance. It is not a fault.
How do I reset the Zero XE after it tips over?
The tip-over sensor disables the drive so the bike can't be ridden or charged while down. Stand it fully upright, turn the key OFF and wait for the display to go blank, then turn the key back ON to reset the sensor and resume riding.
How should I store the Zero XE battery long-term?
For storage over 30 days, set the battery to 40–60% charge, keep it at 68–77°F (20–25°C) in a dry, ventilated place, and top it up monthly to stay in that band. Once a year, fully charge it to 100% then discharge below 10%. Leaving the pack deeply discharged can cause permanent, warranty-excluded damage.
This guide is an independent synthesis of the official Zero Motorcycles owner & service manuals, rewritten for clarity. Figures are stated as published for the latest model year and may vary by year, region and options. Always follow your bike's own manual and a qualified technician for service. Zero Motorcycles is a trademark of its respective owner.